The wrong abrasive for your material is a false economy. Use 40-grit aluminium oxide on soft wood and you’ll clog the disc, burn the surface, and waste an hour cleaning up. Use 150-grit ceramic on steel and you’ll barely scratch the mill scale. The material you’re sanding determines which abrasive type, which grit progression, and which backing technology will work best.
This guide breaks down the best sanding pad choices for the three most common jobsite materials: wood, metal, and plaster. You’ll learn grit progressions for each, understand the abrasive types available, and find specific product recommendations.
Grit Selection Guide: What Each Grit Does
| Grit Range | Name | Use Case | Material Best For |
|---|---|---|---|
| 40–60 | Coarse | Heavy stock removal, paint stripping, rust removal | Unfinished wood, steel, rust |
| 80–100 | Medium-Coarse | Rough shaping, aggressive prep work | Raw wood, plaster damage repair |
| 120–150 | Medium | General surface preparation, main finishing passes | Wood stain prep, plaster finishing, metal smoothing |
| 180–220 | Fine | Between-coats finishing, final prep before paint/stain | Stained wood, sealed plaster |
| 280–400 | Very Fine | Final finish, high-end woodwork, mirror-smooth surfaces | Furniture, prefinished wood, premium plaster work |
Best Sander Pads for Wood
Wood is the most common jobsite sanding application. Whether you’re preparing bare timber for stain, sanding between paint coats, or doing restoration work, the right grit progression is essential.
Abrasive Type for Wood: Aluminium Oxide
Aluminium oxide is the industry standard for wood sanding. It’s relatively affordable, durable enough for multiple passes, and produces a good surface finish. Aluminium oxide grains fracture under load, which means they self-sharpen slightly — staying aggressive longer than ceramic alternatives.
Alternative: Ceramic abrasives (covered below) are more aggressive and longer-lasting, but cost 30–50% more. Use ceramic if you sand wood professionally 5+ days per week; for occasional work, aluminium oxide is sufficient.
Grit Progression for Bare Wood
If you’re starting with unfinished timber (e.g., rough sawn or after stripping old paint):
Step 1: 80-Grit (Aggressive prep)
Start here if the wood is rough, has old paint, or surface irregularities. 80-grit removes paint quickly but leaves visible scratch marks. One aggressive pass takes 15–20 minutes per door or panel.
Step 2: 120-Grit (Main smoothing)
This is the workhorse step. 120-grit removes the 80-grit scratches and creates a smooth, ready-to-stain surface. Spend 10–15 minutes per panel at this stage.
Step 3: 180-Grit (Final prep for finish)< Only use this if you're staining (not painting). 180-grit produces an ultra-smooth surface that accepts stain evenly. If you're painting, skip to primer.
Typical time per standard interior door: 45–60 minutes (all three passes)
Grit Progression for Between-Coats Finishing
If wood is already stained/sealed and you’re sanding between coats:
Step 1: 180-Grit (Light scuff)
Knock down the gloss from the previous coat without cutting into the stain. One gentle pass, 5–8 minutes per panel.
Step 2: 220-Grit (Final finish)
If you need ultra-smooth between coats, follow 180 with 220. Most professionals skip this and go straight to the next coat of finish after 180.
Recommended Products for Wood
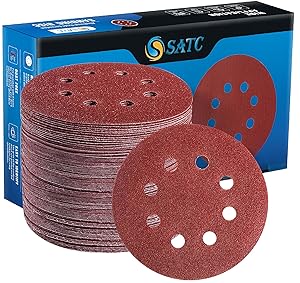
- 80-Grit Aluminium Oxide (Hook-and-Loop, 125mm): Browse on Amazon UK — Budget brands (e.g., Silverline, Kennedy) work fine for this grit; expect £0.50–0.80 per disc.
- 120-Grit Aluminium Oxide: Browse on Amazon UK — The most-used grit; high availability and competitive pricing.
- 180-Grit Aluminium Oxide: Browse on Amazon UK — Standard fine-finishing grit.
- Ceramic (all grits): Browse on Amazon UK — Premium option; 30–50% more expensive but lasts 2–7x longer. Only worth it for high-volume use.
Best Sander Pads for Metal
Metal sanding is more demanding than wood. Steel scale, rust, and paint buildup require aggressive abrasives and careful technique to avoid overheating or glazing the surface.
Abrasive Type for Metal: Ceramic or Zirconia
Ceramic and zirconia abrasives are specifically designed for metal work. They’re harder and last significantly longer than aluminium oxide on steel or stainless steel.
- Ceramic: Medium-aggressive; suitable for mild steel, rust removal, paint prep. Slightly longer-lasting than aluminium oxide on metal.
- Zirconia: Highly aggressive; designed for stainless steel, hard metals, heavy rust removal. The most durable option for metal but also the most expensive.
Avoid aluminium oxide on metal. It glazes quickly on steel (meaning the grains become smooth and stop cutting) and requires frequent disc changes. Ceramic or zirconia will save you time and money on metal jobs.
Grit Progression for Metal
For light surface prep (paint or rust removal on mild steel):
Step 1: 60-Grit Ceramic
Removes rust, paint, and mill scale quickly. Use for initial aggressive removal.
Step 2: 100-Grit Ceramic
Smooths the surface after 60-grit. Creates a finish ready for welding prep or painting.
For heavy rust or scale (structural steel):
Step 1: 40-Grit Zirconia
Extreme removal. Use only for severe mill scale or heavy rust. Very aggressive; risk of overheating if you hold in one spot too long.
Step 2: 60-Grit Zirconia
Follow-up smoothing pass.
Step 3: 100-Grit Ceramic or Zirconia
Final finish before welding or painting.
Typical time per square metre of light steel prep: 20–30 minutes
Recommended Products for Metal
- 60-Grit Ceramic (Hook-and-Loop, 125mm): Browse on Amazon UK — Standard for light metal work.
- 40-Grit Zirconia: Browse on Amazon UK — Heavy-duty rust and scale removal.
- 100-Grit Ceramic: Browse on Amazon UK — Finishing pass for metal prep.
Metal Sanding Safety Notes
- Wear gloves: Metal particles are sharp and can cut your hands; debris flying during sanding is more dangerous than wood dust.
- Use proper dust extraction: Metal dust is conductive; static buildup is a risk. Use a grounded dust extraction system rated for metal sanding.
- Don’t overheat: If the metal starts to discolour (bluish tint on steel), you’re generating too much friction. Let the machine cool, reduce pressure, and use a more aggressive grit.
- Eye protection is mandatory: Angle grinders and heavy metal sanding throw particles faster than woodworking. Wear safety glasses or a face shield.
Best Sander Pads for Plaster and Drywall
Plaster and drywall require special consideration. Both materials clog discs quickly because of their fine dust. Dust extraction is essential — poor extraction means a dusty workspace and poor finish.
Abrasive Type for Plaster: Aluminium Oxide or Mesh
Aluminium oxide works for plaster, but mesh-backed discs are superior. Mesh backing prevents clogging by allowing air to flow through the disc back, preventing fine plaster dust from settling and hardening on the surface.
Traditional hole-pattern discs will clog when sanding plaster; you’ll change discs frequently. Mesh discs cost more but last 2–7x longer on plaster, making them cost-effective over a full job.
Grit Progression for Plaster
For fill sanding (smoothing spackling or joint compound):
Step 1: 120-Grit Mesh
Remove rough compound and bumps. Mesh prevents clogging.
Step 2: 150-Grit Mesh
Smooth the previous pass and prepare for paint.
For damaged plaster repair (large areas):
Step 1: 80-Grit Standard (Aluminium Oxide)
Remove loose plaster and large irregularities. Standard discs are fine for this coarse work.
Step 2: 120-Grit Mesh
Smooth and blend repaired areas. Mesh is now essential to prevent clogging.
Step 3: 150-Grit Mesh
Final finish before paint.
Typical time per 4m² wall patch: 30–45 minutes (with mesh to prevent multiple disc changes)
Recommended Products for Plaster
- 120-Grit Mesh (Hook-and-Loop, 125mm): Browse on Amazon UK — Anti-clog design; essential for plaster work.
- 150-Grit Mesh: Browse on Amazon UK — Final finishing grit for plaster.
- 80-Grit Standard (Aluminium Oxide): Browse on Amazon UK — For aggressive initial removal before switching to mesh.
Dust Control for Plaster Work
Plaster and drywall dust is extremely fine and can settle on every surface in a property. Proper dust extraction isn’t optional — it’s the difference between a controlled jobsite and a dusty mess.
- Use industrial dust extraction: A standard DIY sander’s dust bag captures ~70% of plaster dust. A trade-spec extraction system captures 95%+. If you sand plaster regularly, invest in proper extraction.
- Use sealed extraction hoses: Loose connections leak fine dust. All hose connections should be tight and sealed.
- Mesh discs reduce clogging by ~80%: Fewer disc changes = less dust generation from removal/installation cycles.
- Wear a dust mask: Even with good extraction, fine plaster dust is everywhere. FFP2 or FFP3 masks are essential.
Abrasive Material Comparison: Which Is Best for Your Work?
| Abrasive Type | Durability | Cost | Best For | Avoid On |
|---|---|---|---|---|
| Aluminium Oxide | Medium (self-sharpening) | £££ Low | Wood, general carpentry, DIY | Hard metals, stainless steel |
| Ceramic | High (fractures for sharpness) | £££ Medium | Metal, stainless steel, frequent heavy use | Soft materials (waste of cost) |
| Zirconia | Very High (extremely durable) | ££ High | Heavy industrial, stainless steel, extreme wear | Occasional use (overkill) |
| Mesh Backing | N/A (backing tech) | £££ Medium-High | Plaster, drywall, soft materials, anti-clog | Hard metals (waste; use ceramic) |
Backing Material Options: Paper vs Cloth vs Film
Beyond the grit and abrasive type, sanding discs come with different backings. Each affects durability and performance.
Paper Backing
Paper is the budget option. It’s lightweight, flexes easily, and is fine for light-duty work. It degrades quickly on heavy material (metal) and can tear if you apply excessive pressure. Cost: £0.30–0.50 per disc.
Use for: DIY, light carpentry, occasional use.
Cloth Backing
Cloth (polyester or cotton) is the standard for trade work. It’s durable, doesn’t tear easily, and lasts significantly longer than paper. Most professional-grade discs use cloth backing. Cost: £0.40–0.80 per disc.
Use for: All trade work, regular heavy use, metal and wood sanding.
Film Backing
Film (waterproof backing) is designed for wet sanding applications. It doesn’t degrade in water and is essential for profile work or sanding near moisture. Cost: £1.20–2.00 per disc (premium).
Use for: Wet sanding, profile work, plaster in damp conditions, specialist applications.
Grit Progression Quick Reference
| Job Type | Step 1 | Step 2 | Step 3 | Total Time |
|---|---|---|---|---|
| Bare wood to stain | 80-grit (15 min) | 120-grit (12 min) | 180-grit (8 min) | ~35 min per door |
| Paint strip & repaint | 60-grit (20 min) | 120-grit (10 min) | Primer ready | ~30 min per panel |
| Steel rust removal | 60-grit ceramic (25 min) | 100-grit ceramic (15 min) | Paint ready | ~40 min per sq m |
| Plaster fill sanding | 120-grit mesh (12 min) | 150-grit mesh (8 min) | Paint ready | ~20 min per patch |
Cost Analysis: Budget vs Premium Discs
Budget discs (£0.30–0.50) vs premium discs (£1.00–1.50):
- Budget discs: Lower upfront cost but clog/glaze faster, requiring more frequent changes. On a large job, you might use 15 budget discs where 8 premium discs would finish the same work.
- Premium discs: Higher per-disc cost but longer life. You change discs less frequently, spend less time on disc swaps, and get a better surface finish with fewer passes.
Break-even analysis: If you sand 5+ hours per week, premium discs typically pay for themselves within a month through labour time savings and better first-pass finish.
For occasional/DIY use: Budget discs are fine — you’ll use 5–10 discs per year anyway.
For trade use: Premium discs (or ceramic) are a legitimate business investment. Factor them into your job quotes.
Related Guides on This Site
- Sander Pad Compatibility Guide — Full compatibility reference
- Hook-and-Loop vs PSA Sanding Discs — Backing system comparison
- 125mm vs 150mm Sander Pads — Size selection
- Sander Pad Hole Pattern Guide — Dust extraction patterns
Watch: Video Guide
Frequently Asked Questions
What grit should I use for removing old paint from wood?
Start with 60-grit to remove paint quickly, then follow with 80-grit to clean up scratches. 60-grit is aggressive enough to strip paint but will leave visible marks. 80-grit smooths it for staining. If you’re painting over (not staining), you can skip 80 and go straight to 120-grit for final prep.
Can I use wood-sanding discs on metal?
You can, but you’ll waste money and time. Aluminium oxide (typical wood disc) glazes quickly on steel, losing its cutting ability. You’ll need to change discs frequently. Use ceramic or zirconia specifically for metal — you’ll use fewer discs and finish faster.
What’s the difference between 120-grit and 150-grit on plaster?
150-grit leaves a slightly smoother surface — good for high-end finishes or areas where you’ll apply glossy paint. 120-grit is fine for standard matt finishes. The difference is subtle; most professionals use 120 and save the money.
How many passes should I make with each grit?
On wood: one pass per grit is standard for flat surfaces. On plaster: two light passes per grit (one horizontal, one vertical) ensures even finish. On metal: press harder and one aggressive pass per grit usually suffices for paint prep (you’re not trying for a polished finish).
Is ceramic worth the extra cost on wood?
Not really, unless you sand professionally 10+ hours per week. Ceramic’s advantage is durability on hard materials (metal, plaster). On softwood, aluminium oxide self-sharpens adequately for the cost savings. Save ceramic for metal work.
What’s the best grit for sanding between paint coats?
180-grit. It’s fine enough to knock down gloss without cutting into the paint layer, and aggressive enough to key the surface for the next coat. 150-grit works too but might cut too deeply; 220-grit is unnecessarily fine for this task.
Should I always follow grit progressions or can I skip steps?
You can skip steps if the surface is already reasonably smooth, but skipping too many steps means you’ll spend longer at the final grit removing the previous grit’s scratches. The progression exists to save labour time. Only skip if you’re confident the surface doesn’t need the intermediate step.